I'm in the kitchen today, folks, because it's raining. Something like the first rain in 50 days or something. So I'm not complaining!
In the oven right now are Oatmeal Scotchies. These are your basic oatmeal cookies with a sweet twist. When you are mixing up the batter, add in 1 cup butterscotch chips. Let me tell you - the smell is so good!
I'll be back soon to share all of the goodies I've been making! This time of year is my favorite - there are so many great seasonal recipes to try! What ones have you been trying? Dish it! :)
Saturday, October 23, 2010
Sunday, October 17, 2010
Meeting Bakerella!
Oh my. Just looking at the pictures again makes me feel bubbly inside again! It still seems surreal that I met Bakerella!
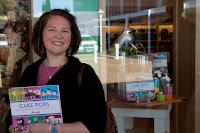 We got to Williams-Sonoma early. Which was perfect for taking some pictures outside of the store. There was a really cute setup of Cake Pops in the WS window.
You can't tell how nice and warm the weather was by these pictures, but you can tell how breezy it was. :)
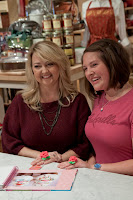
 And there she is! Bakerella did a great question-and-answer demonstration session. We could ask questions about cake pops, and Bakerella would answer them.
 She also showed us some of the products she uses, including the markers she uses to draw details on her cake pops and candy coating she uses to create raised details for her designs.
And then... We got to try her cake pops! Oh my, were they delish! It was nice to see the texture of the cake and the thickness of the coating for comparison.


I gave Bakerella one of my handmade rose rings. She loved it! She actually took off the ring she was wearing to put it on her finger. That was so sweet of her to do!
 Here we are modeling our matching rings. :)
This was really a great experience. It was so fun to meet Bakerella! I follow her baking blog, and I hope you do (or will!) too!
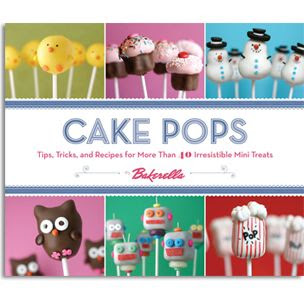
You really should get a copy of Cake Pops if you don't already have one. My favorites are the clowns and the sheep!
I hope you get the chance to meet Bakerella too! Check out her website for tour details!
 We got to Williams-Sonoma early. Which was perfect for taking some pictures outside of the store. There was a really cute setup of Cake Pops in the WS window.
You can't tell how nice and warm the weather was by these pictures, but you can tell how breezy it was. :)
 And there she is! Bakerella did a great question-and-answer demonstration session. We could ask questions about cake pops, and Bakerella would answer them.
 She also showed us some of the products she uses, including the markers she uses to draw details on her cake pops and candy coating she uses to create raised details for her designs.
And then... We got to try her cake pops! Oh my, were they delish! It was nice to see the texture of the cake and the thickness of the coating for comparison.


I gave Bakerella one of my handmade rose rings. She loved it! She actually took off the ring she was wearing to put it on her finger. That was so sweet of her to do!
 Here we are modeling our matching rings. :)
This was really a great experience. It was so fun to meet Bakerella! I follow her baking blog, and I hope you do (or will!) too!
You really should get a copy of Cake Pops if you don't already have one. My favorites are the clowns and the sheep!
I hope you get the chance to meet Bakerella too! Check out her website for tour details!
Giant donut anyone?

Yesterday when I was at Williams-Sonoma, waiting for Bakerella, I looked around the store for some new inspiration.
And boy, did I find it! WS carries so many cute baking tools - from baking pans to books with great recipes to the sprinkles that finish take the cake to it's finished state.
I had trouble deciding what to bring home! But I settled on one of the cutest things I've seen in awhile.
The Giant Donut Cake Pan Set.
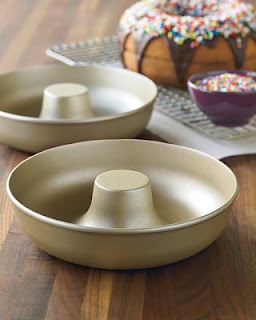
It is so cute! The box also has a recipe for a chocolate glazed donut (the recipe is also available on the website). The box states that the cake can serve 16.
This may be my breakfast for the next week.
And now I also have my Christmas Wish List ready. I would like the mini tiered cakelet pan, the sandwich cookie cake pan, the railway cake pan, and the buttercup cakelet pan.
That is all. ;)
What cute baking tools have you seen lately?
Saturday, October 16, 2010
How about the sweetest day ever?
 Today I met the queen of cake pops.
Yes, Bakerella!
And on Sweetest Day. How perfect is that?! And she was such a sweetheart herself!
If you haven't gotten Bakerella's book Cake Pops yet, you are missing out! I actually have two copies - one that Bakerella signed for me today, and another to use while I'm baking. Bakerella did a great question and answer conversation before signing books. People could ask questions about cake pops, and Bakerella would answer them, giving out suggestions and great helpful tips.
It was perfect.
Then the book signing began. It was like Christmas. Only better.
I gave Bakerella one of my famous flower rings. And she loved it!
Pictures are to come! I'm still clapping my hands with excitement!
Thursday, September 16, 2010
Make-Bake-Decorate Series
DECORATE.
This is my favorite part. I really love all parts of cake making, but decorating is my favorite of my favorite parts.
 I make my buttercream icing from scratch. It makes enough, sometimes a bit more than enough, and I can control the consistency.
Like with the cake, I mix the wet ingredients together first, and then add the dry ingredients slowly.
Except for that one time when I was in a hurry. Let's just say the powdered sugar made it across the kitchen to the refrigerator. And not while it was in a bowl.
Homemade buttercream icing goes through stages while it's coming together - it starts off almost like a pie crust, and then it becomes smooth the longer you blend it. Then, based on the thickness of the icing you prefer, you can gradually make it thinner.
 Once the icing is your preferred thickness, you're ready to crumb coat your cake. This is a thin layer of icing that keeps any cake crumbs from showing through on your final coat of icing.
Smooth the icing on evenly, and pay no attention to any crumbs in the icing. These will be hidden by the final, finished coat of icing.
When you are finished with the crumb coat, let the cake sit for a few minutes. This helps the icing to set.
 Now's the time to add your final layer of icing to finish the cake.
Quick tip - once you smooth the icing on, let it set for a few minutes again. To make the icing appear smooth, take a small piece of parchment paper and place it against the cake. Take a drinking glass and gently smooth it along the parchment paper.
Making sure your icing has set a bit before this step is crucial - you don't want to pull off any of the icing when you remove the parchment paper.
Now is the fun part. Be creative! For my mom's cake, I used roses that I made from royal icing. You could do anything your heart desires! Keep watching for more ideas to create cakestraordinary cakes!
Was this tutorial helpful? What steps do you do? What steps do you do differently? Anything else you want to know about my process?
This is my favorite part. I really love all parts of cake making, but decorating is my favorite of my favorite parts.
 I make my buttercream icing from scratch. It makes enough, sometimes a bit more than enough, and I can control the consistency.
Like with the cake, I mix the wet ingredients together first, and then add the dry ingredients slowly.
Except for that one time when I was in a hurry. Let's just say the powdered sugar made it across the kitchen to the refrigerator. And not while it was in a bowl.
Homemade buttercream icing goes through stages while it's coming together - it starts off almost like a pie crust, and then it becomes smooth the longer you blend it. Then, based on the thickness of the icing you prefer, you can gradually make it thinner.
 Once the icing is your preferred thickness, you're ready to crumb coat your cake. This is a thin layer of icing that keeps any cake crumbs from showing through on your final coat of icing.
Smooth the icing on evenly, and pay no attention to any crumbs in the icing. These will be hidden by the final, finished coat of icing.
When you are finished with the crumb coat, let the cake sit for a few minutes. This helps the icing to set.
 Now's the time to add your final layer of icing to finish the cake.
 Quick tip - once you smooth the icing on, let it set for a few minutes again. To make the icing appear smooth, take a small piece of parchment paper and place it against the cake. Take a drinking glass and gently smooth it along the parchment paper.
Making sure your icing has set a bit before this step is crucial - you don't want to pull off any of the icing when you remove the parchment paper.
Now is the fun part. Be creative! For my mom's cake, I used roses that I made from royal icing. You could do anything your heart desires! Keep watching for more ideas to create cakestraordinary cakes!
Was this tutorial helpful? What steps do you do? What steps do you do differently? Anything else you want to know about my process?
Friday, August 20, 2010
Make-Bake-Decorate Series
BAKE.
You've got your cake mixed. Now what do you do with it? You bake it, of course!
Good, sturdy, quality pans are your best bet for cakes that bake evenly. There are all kinds of brands to choose from. My the pans that I use are from different brands, and the ones in this post are just some of them.
Also, you can choose a shaped pan as well. My favorites that I own are lips and hearts. This cake was a two-layer cake, and I used two square pans for each layer.
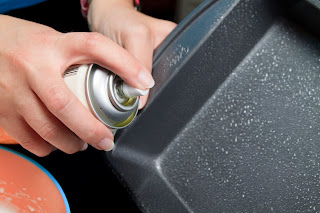 I used cooking spray to ensure the finished cake doesn't stick to the pans. That would be no fun. If you haven't experienced this, try not to. :)
You can also use butter or margarine, and you could also flour your pan after you coat it.
I find the nonstick spray to do the job on its own just fine.
Make sure you cover the entire bottom, sides, and especially the corners.
 Pour the cake mix evenly into your pan or pans.
Once the pans are filled, gently tap them on the surface of your counter. This helps the air bubbles to come to the top of the cake - and you can pop them. This helps the cake to be smooth on the inside.
I bake both of my cake layers at the same time. I place them on the same shelf in the oven, right next to each other. My oven is fairly new - just over a year old, and I haven't found it to bake anything unevenly. You know your oven best, so do what works best for you. I have yet to have two layers come out of the oven baked unevenly.
The same goes for timing the baking. I know my oven like I know my cakes, and I have got the perfect timing down to a science for my oven. Do what works best for you! :)
Stay tuned for the sweetest post of this series, and my favorite part of cakes - the decorating!
You've got your cake mixed. Now what do you do with it? You bake it, of course!
Good, sturdy, quality pans are your best bet for cakes that bake evenly. There are all kinds of brands to choose from. My the pans that I use are from different brands, and the ones in this post are just some of them.
Also, you can choose a shaped pan as well. My favorites that I own are lips and hearts. This cake was a two-layer cake, and I used two square pans for each layer.
 I used cooking spray to ensure the finished cake doesn't stick to the pans. That would be no fun. If you haven't experienced this, try not to. :)
You can also use butter or margarine, and you could also flour your pan after you coat it.
I find the nonstick spray to do the job on its own just fine.
Make sure you cover the entire bottom, sides, and especially the corners.
 Pour the cake mix evenly into your pan or pans.
 Once the pans are filled, gently tap them on the surface of your counter. This helps the air bubbles to come to the top of the cake - and you can pop them. This helps the cake to be smooth on the inside.
I bake both of my cake layers at the same time. I place them on the same shelf in the oven, right next to each other. My oven is fairly new - just over a year old, and I haven't found it to bake anything unevenly. You know your oven best, so do what works best for you. I have yet to have two layers come out of the oven baked unevenly.
The same goes for timing the baking. I know my oven like I know my cakes, and I have got the perfect timing down to a science for my oven. Do what works best for you! :)
Stay tuned for the sweetest post of this series, and my favorite part of cakes - the decorating!
Saturday, August 7, 2010
Make-Bake-Decorate Series
MAKE.
It's the moment you all have been waiting for - the first post in the step-by-step process of making my mom's birthday cake. I know some of the details are a bit, say, elementary, but have you ever really taken pictures of your process? It's actually really fun. Especially if you have a photographer boyfriend. ;)
Today's post is all about getting the ingredients ready to make a cake from a mix.
Alright. Let's do this.
All that I needed for this cake was eggs, water, oil and the cake mix. The cake mix was for a white cake, so I needed to separate the eggs. My trusty tool of choice? My own hands.
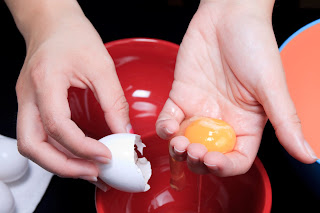 To do this, simply crack the egg gently. Remove the top portion of the shell, and pour the egg yolk and egg white into your hand. Gently rock the egg yolk back and forth between your hands and let the egg white fall into a small bowl.
It helps to have two bowls when you are doing this - one for the egg white and one for the egg yolk. I like to use my left over yolks in scrambled eggs.
I have never used an egg separator, so I don't know how this process compares, but it works the best for me. A little messy, yes, but it works.
 Next, I mix the oil and water together. Just measure and pour.
I mix the water and oil together in a separate bowl from the eggs. This is just a precaution - if I make a mistake, it's easier to start over with fewer mixed ingredients.
Call me silly, but I like watching the oil and water separate in the bowl.
Then, I add the eggs and the cake mix.
I usually use a white cake mix. It's my personal favorite flavor of cake.

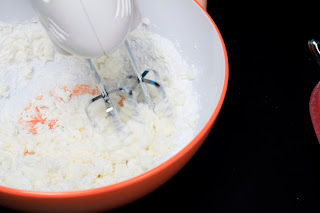
Referring back to my post on mixing cakes, I used an electric hand mixer for this one. It's up to you. I mix it for 2 minutes to add air to the batter to make the cake fluffy. Skip this step once, and you won't make the same mistake again.
I can tell the difference between a cake batter with air and cake batter without. It's subtle, but it's a detail you don't want to skip.
Alright, there you have it. My process for making a cake. Next up is baking, and it's a hot little post you won't want to miss!
It's the moment you all have been waiting for - the first post in the step-by-step process of making my mom's birthday cake. I know some of the details are a bit, say, elementary, but have you ever really taken pictures of your process? It's actually really fun. Especially if you have a photographer boyfriend. ;)
Today's post is all about getting the ingredients ready to make a cake from a mix.
Alright. Let's do this.
All that I needed for this cake was eggs, water, oil and the cake mix. The cake mix was for a white cake, so I needed to separate the eggs. My trusty tool of choice? My own hands.
 To do this, simply crack the egg gently. Remove the top portion of the shell, and pour the egg yolk and egg white into your hand. Gently rock the egg yolk back and forth between your hands and let the egg white fall into a small bowl.
It helps to have two bowls when you are doing this - one for the egg white and one for the egg yolk. I like to use my left over yolks in scrambled eggs.
I have never used an egg separator, so I don't know how this process compares, but it works the best for me. A little messy, yes, but it works.
 Next, I mix the oil and water together. Just measure and pour.
I mix the water and oil together in a separate bowl from the eggs. This is just a precaution - if I make a mistake, it's easier to start over with fewer mixed ingredients.
Call me silly, but I like watching the oil and water separate in the bowl.
Then, I add the eggs and the cake mix.
I usually use a white cake mix. It's my personal favorite flavor of cake.

Referring back to my post on mixing cakes, I used an electric hand mixer for this one. It's up to you. I mix it for 2 minutes to add air to the batter to make the cake fluffy. Skip this step once, and you won't make the same mistake again.
I can tell the difference between a cake batter with air and cake batter without. It's subtle, but it's a detail you don't want to skip.
Alright, there you have it. My process for making a cake. Next up is baking, and it's a hot little post you won't want to miss!
Saturday, July 31, 2010
Just beat iiiiit!

Imagine me rocking out to Michael Jackson's song... Wait, don't.
But do think about this: which works better for you - hand mixing with a whisk or using an electric hand mixer?
Honestly, I like both. I used to work as a waitress for several years, and I have built up a strong muscle in my wrist from carrying large trays of food. Hand mixing doesn't bother me, and it helps me feel like I really baked the cake from scratch, even if it's really a cake mix from a box.
Using an electric hand mixer is usually my first choice, though. I find that the electric hand mixer adds a lot more air to my cakes to make them fluffier than hand mixing can for me.
What are your thoughts? Do you have a strong opinion on which you prefer to use? Dish it.
Monday, July 19, 2010
Happy birthday to my mom!

I made this cake for my mom's birthday. Strangely, when I was deciding on what design to make for my mom's cake, I realized I hadn't used my new Wilton square cake pans. I know. How is that possible? These pans are very nice to use - they baked the cake evenly. Stay tuned for a unique step-by-step process on how this cake came to be.
Sunday, June 27, 2010
Icing on the...

Who says you can only put icing flowers on cake? Use them to decorate all sorts of desserts, brownies included. This cute idea would be great for a tea party, a little girl's birthday or any time you want to showcase your decorating talents. The combination of pink icing with brownies is my favorite, but the possibilities are as endless as the colors you can create. These ribbon roses are deliciously simple, much like brownies, but any flower could be used as well. Imagine white daisies, orange chrysanthemums or even purple violets. How would you choose to decorate brownies or another dessert?
Friday, June 25, 2010
Star of the Show

Don't overlook miniature cookie cutters! They make great bite-size bits to serve at a party or to keep at home for a sweet snack. You can choose to ice the cookie smoothly and completely, or you can dollop the frosting on the cookie, making a little mound in the center. Sprinkle with colored sugar, and you're done!
Best of Both Worlds

What's better than cookies or cupcakes? How about cookies shaped like cupcakes!
Check out the cookie cutters here. They come in a set of two, and they are slightly different sizes. It's so much fun to decorate the cookies! For the bottom, smooth the frosting on thinly and pipe lines to mimic the design of a cupcake liner. For the top, keep the frosting thicker. Create swirls in the frosting for a different texture. Add some sprinkles and a red hot for the cherry on top and you're done!
Well, there is another step - but that's obvious:

Thursday, June 24, 2010
Let's Face It
 Family tree cakes are a fun way to get the whole family in on the sweetness. A plain tree transforms into a family memory with the addition of familiar faces. Just make sure you don't "leaf" anyone out!
Wednesday, June 23, 2010
Love You!

Need a quick - and most importantly, cute - way to show someone you love them? It just takes three steps. First, make some cupcakes/cookies/pick your poison - it doesn't really matter, just make it yummy. Next, melt some chocolate, and place in a plastic baggie and cut a tiny hole in the corner. To make it easy, line a cookie sheet with parchment paper. Write your message to your sweetie on the parchment paper. Finally, let the message harden in the fridge for a few minutes. Carefully peel the message off of the parchment paper and place on your dessert. This is as sweet as a kiss on the cheek!

Tuesday, June 22, 2010
Taking Shape

Quick Tip Tuesday:
Wrangle those sprinkles! To get precise shapes, lightly place a cookie cutter on top of your cupcake. Pour just enough sprinkles inside of the cookie cutter and gently shake to cover the area inside of the cookie cutter. You may want to gently press the sprinkles into the frosting to make them stick. When you pull the cookie cutter away, you will be left with a beautiful design!
Monday, June 21, 2010
Basket Bliss

Keep it simple - monotone or dual-tone cakes make an elegant statement. Check out the blooms on this sweet cake. Yellow roses and white daisies with yellow centers look just perfect on a white basket cake. What's your favorite combination?
Sunday, June 20, 2010
Peanut Butter Goodness

These cookies are so easy to make, but they taste so great! A simple batch of peanut butter cookies gets an uplift with the addition of miniature peanut butter cups. Simply add the peanut buttercup to the cookie after it has cooled slightly. Make sure you cook up a double batch!
Friday, April 23, 2010
Have a Daisy of a Day!

Have a Daisy of a Day!
This cake is a cute way to celebrate spring! Of course, the daisies can be swapped out with other flowers, and a mix of flowers would look just as pretty! The daisies and birds are made with royal icing, but the rest of the cake is buttercream!
Subscribe to:
Posts (Atom)